Build and deploy a server-side app
What you’ll achieve
You’ll build and deploy a server-side app that sends and receives data via Awala. Think of it as a “Hello world” tutorial – the app itself will be trivial because it just communicates with Awala Ping.
The following diagram illustrates the architecture of the app you’ll build, and where it fits the in the Awala network as it communicates with Awala Ping:

Awala-compatible, server-side apps can be written in any language and deployed to any platform, but this codelab will only use examples in Node.js and Kotlin on Google Cloud Platform.
You shouldn’t need more than 30 minutes to complete the codelab, once the pre-requisites are met.
Pre-requisites
- Familiarity with either Node.js or Kotlin (we may add more examples in the future).
- A domain name with DNSSEC correctly configured. Use DNSSEC Analyzer to verify this.
- A Google Cloud Platform account with billing configured.
- A MongoDB Atlas account with billing configured.
- Terraform v1.5+.
- Docker.
- A Docker Hub account, so you can deploy the Docker image you’ll create.
- An Android device, so you can test your app end-to-end.
Estimated costs
To the best of our knowledge, this codelab shouldn’t cost anything if you’re able to use the free tier of GCP and MongoDB Atlas – otherwise, it should cost less than $4/day or a few cents per minute as of this writing.
Having said this, you’re solely responsible for any costs incurred whilst following this codelab. We’re only offering an estimate based on our own experience, not a guarantee.
Make sure to clean up at the end to avoid incurring in further costs.
Troubleshooting
If something doesn’t work as expected at any time, check out the final code or ask for help.
Steps
1. Set up your development environment
Open your terminal and create the directory aie-gcp with two subdirectories: codelab-tf and codelab-app. For example:
mkdir -p aie-gcp/infrastructure aie-gcp/app
infrastructure/ will contain the Terraform code to manage your GCP and MongoDB Atlas resources, whilst app/ will contain the code for your app.
Next, create the file air-gcp/infrastructure/providers.tf with the following content to configure the Terraform providers you’ll use:
terraform {
  required_providers {
    google = {
      version = "~> 4.84.0"
    }
    mongodbatlas = {
      source  = "mongodb/mongodbatlas"
      version = "~> 1.10.2"
    }
  }
}
Finally, initialise your workspace and install the providers above:
terraform init
2. Create and configure a new GCP project
First, configure your GCP project as follows:
- Create a new project from the GCP Console.
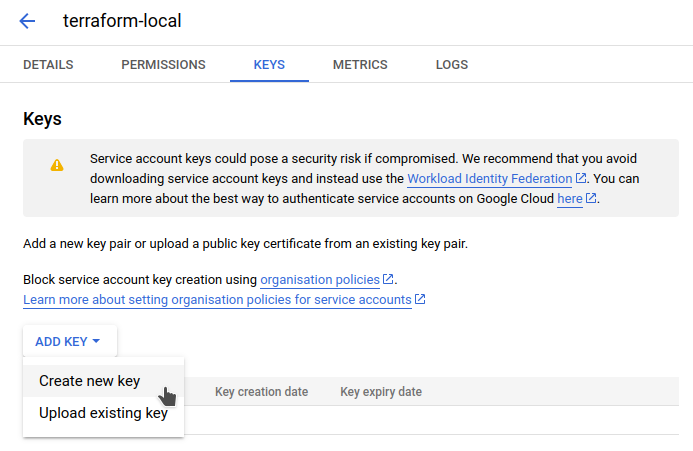
- Create a new service account with the Owner (
roles/owner) role. - Generate a new key for the service account you just created from the “Keys” tab, and save the JSON file to disk.
- Enable the Cloud Resource Manager API.
Next, integrate your project in Terraform:
- Create
aie-gcp/infrastructure/gcp.tfwith the following content:variable "google_project_id" {} variable "google_credentials_path" {} variable "google_region" { default = "europe-west1" } locals { gcp_services = [ "run.googleapis.com", "compute.googleapis.com", "cloudkms.googleapis.com", "pubsub.googleapis.com", "secretmanager.googleapis.com", "iam.googleapis.com", ] } provider "google" { project = var.google_project_id credentials = file(var.google_credentials_path) } provider "google-beta" { project = var.google_project_id credentials = file(var.google_credentials_path) } resource "google_project_service" "services" { for_each = toset(local.gcp_services) service = each.value disable_dependent_services = true } - Create
aie-gcp/infrastructure/terraform.tfvarswith the following content – make sure to replace the placeholders with the correct values:google_project_id = "<YOUR-GCP-PROJECT-ID>" google_credentials_path = "<PATH-TO-GCP-CREDENTIALS-JSON>"
Finally, get Terraform to complete the setup:
terraform apply
It should normally take a couple of minutes for Terraform to complete the setup.
3. Create and configure a new MongoDB Atlas project
- Create a new project from the MongoDB Atlas console.
- Go to the Access Management section of your newly-created project.
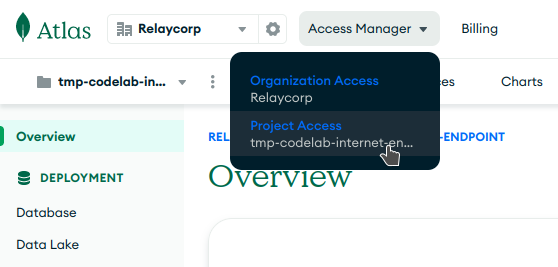
- Create an API key with the Project Owner role.
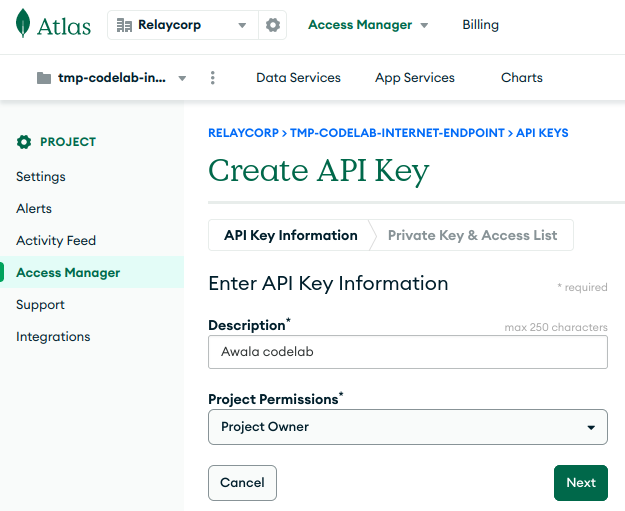
- Keep the browser tab open, so you can copy the public and private keys shortly.
Next, integrate your MongoDB Atlas project in Terraform and create the required resources:
- Create
aie-gcp/infrastructure/mongodbatlas.tfwith the following content:variable "mongodbatlas_public_key" {} variable "mongodbatlas_private_key" {} variable "mongodbatlas_project_id" {} provider "mongodbatlas" { public_key = var.mongodbatlas_public_key private_key = var.mongodbatlas_private_key } locals { mongodb_db_name = "main" mongodb_uri = "${mongodbatlas_serverless_instance.main.connection_strings_standard_srv}/?retryWrites=true&w=majority" } resource "mongodbatlas_serverless_instance" "main" { project_id = var.mongodbatlas_project_id name = "awala-endpoint" provider_settings_backing_provider_name = "GCP" provider_settings_provider_name = "SERVERLESS" provider_settings_region_name = "WESTERN_EUROPE" } resource "mongodbatlas_project_ip_access_list" "main" { project_id = var.mongodbatlas_project_id comment = "See https://github.com/relaycorp/terraform-google-awala-endpoint/issues/2" cidr_block = "0.0.0.0/0" } resource "mongodbatlas_database_user" "main" { project_id = var.mongodbatlas_project_id username = "awala-endpoint" password = random_password.mongodb_user_password.result auth_database_name = "admin" roles { role_name = "readWrite" database_name = local.mongodb_db_name } } resource "random_password" "mongodb_user_password" { length = 32 } - Store the public and private keys in
aie-gcp/infrastructure/terraform.tfvars, as follows:mongodbatlas_public_key = "<YOUR-PUBLIC-KEY>" mongodbatlas_private_key = "<YOUR-PRIVATE-KEY>" mongodbatlas_project_id = "<YOUR-MONGODB-ATLAS-PROJECT-ID>"
Finally, get Terraform to complete the setup:
terraform apply
It should normally take around 3 minutes for Terraform to complete the setup.
4. Deploy the Awala Internet Endpoint
Now that your GCP and MongoDB Atlas projects are properly configured, we’re ready to deploy the Awala Internet Endpoint (AIE) using its Terraform module for GCP:
- Create the file
aie-gcp/infrastructure/endpoint.tfwith the following content:variable "internet_address" {} variable "pohttp_server_domain" {} module "awala-endpoint" { source = "relaycorp/awala-endpoint/google" version = "1.8.20" backend_name = "pong" internet_address = var.internet_address project_id = var.google_project_id region = var.google_region pohttp_server_domain = var.pohttp_server_domain mongodb_uri = local.mongodb_uri mongodb_db = local.mongodb_db_name mongodb_user = mongodbatlas_database_user.main.username mongodb_password = random_password.mongodb_user_password.result } output "pohttp_server_ip_address" { value = module.awala-endpoint.pohttp_server_ip_address } output "bootstrap_job_name" { value = module.awala-endpoint.bootstrap_job_name } - Specify your DNS configuration in
aie-gcp/infrastructure/terraform.tfvarsby setting:internet_address(the Awala Internet address of your endpoint; e.g.,your-company.com) andpohttp_server_domain(the domain name of your endpoint’s HTTP server; e.g.,awala.your-company.com):internet_address = "your-company.com" pohttp_server_domain = "awala.your-company.com"Tip: The Awala Internet address of your endpoint is what Awala users actually see, so you want to set it to something they’d recognise.
Now use Terraform to deploy the AIE:
terraform init   # Run again to get the AIE module
terraform apply  # Should take ~3 minutes
Use the outputs from the command above to complete the remaining steps by hand:
- Go to your DNS provider to add the following records:
Arecord for the HTTP server, whose IPv4 address can be found in the outputpohttp_server_ip_address.SRVrecord for your Awala Internet address, which should point to theArecord above. For example:_awala-pdc._tcp.your-company.com. 3600 IN SRV 0 0 443 awala.your-company.com.
- Go to the Cloud Run jobs console and manually execute the job specified in the output
bootstrap_job_name.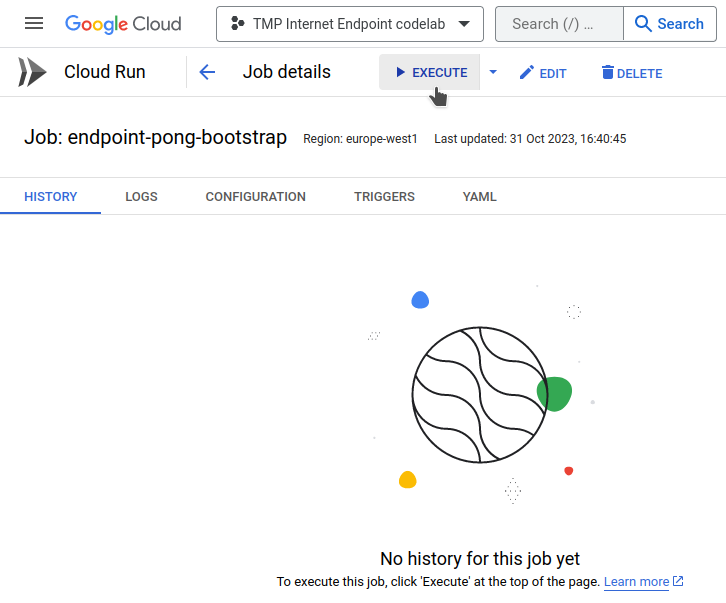
5. Implement your app
You’re basically going to implement an application that receives Awala ping messages and echoes it back in the form of a pong message.
In this case, because we’re using Google PubSub, the app wil receive the ping messages as POST requests and the app will have to use a Google PubSub client to send the pong messages.
The actual implementation depends on the language you use, so pick the one you’re most comfortable with:
-
- Create
aie-gcp/app/package.jsonwith the following content:{ "dependencies": { "@google-cloud/pubsub": "^4.0.6", "env-var": "^7.4.1", "fastify": "^4.24.3" } } - Create
aie-gcp/app/server.jswith the following content:import { PubSub } from '@google-cloud/pubsub'; import envVar from 'env-var'; import Fastify from 'fastify'; const OUTGOING_MESSAGES_TOPIC = envVar.get('OUTGOING_MESSAGES_TOPIC') .required().asString(); const pubSubClient = new PubSub(); const fastify = Fastify({ logger: true }); fastify.get('/', async (_request, reply) => { // Used by the health check return reply.send('All good!'); }); fastify.post('/', async (request, reply) => { // Extract the message and its metadata const pingData = request.body.message.data; const pingMessageAttributes = request.body.message.attributes; const pingSenderId = pingMessageAttributes.source; const pingRecipientId = pingMessageAttributes.subject; // Send the pong message const pongEvent = { data: pingData, attributes: { source: pingRecipientId, subject: pingSenderId, }, }; const topic = pubSubClient.topic(OUTGOING_MESSAGES_TOPIC); await topic.publishMessage(pongEvent); return reply.send('Message processed'); }); const start = async () => { try { await fastify.listen({ port: 8080, host: '0.0.0.0' }); } catch (err) { fastify.log.error(err); process.exit(1); } } start(); - Now create the file
aie-gcp/app/Dockerfilewith the following content:FROM node:20.3.1 WORKDIR /tmp/app COPY . ./ RUN npm install USER node CMD ["node", "--unhandled-rejections=strict", "./server.js"] EXPOSE 8080
- Create
-
- Create
aie-gcp/app/build.gradle.ktswith the following content:plugins { application kotlin("jvm") } application { mainClass.set("com.example.ApplicationKt") } repositories { mavenCentral() } dependencies { implementation("org.jetbrains.kotlin:kotlin-stdlib-jdk8:1.9.10") implementation("io.ktor:ktor-server-core:2.3.4") implementation("io.ktor:ktor-server-netty:2.3.4") } - Create
aie-gcp/app/src/main/kotlin/com/example/Application.ktwith the following content:import com.google.cloud.pubsub.v1.Publisher import com.google.protobuf.ByteString import com.google.pubsub.v1.PubsubMessage import com.google.pubsub.v1.TopicName import io.ktor.application.* import io.ktor.features.ContentNegotiation import io.ktor.http.HttpStatusCode import io.ktor.request.receive import io.ktor.response.respond import io.ktor.routing.get import io.ktor.routing.post import io.ktor.routing.routing import io.ktor.serialization.json import io.ktor.server.engine.embeddedServer import io.ktor.server.netty.Netty import kotlinx.serialization.Serializable @Serializable data class Message(val data: String, val attributes: Map<String, String>) @Serializable data class MessageRequest(val message: Message) fun main() { val outgoingMessagesTopic = System.getenv("OUTGOING_MESSAGES_TOPIC") val projectName = "your-project-id" embeddedServer(Netty, port = 3000, host = "0.0.0.0") { install(ContentNegotiation) { json() } routing { get("/") { call.respond("All good!") } post("/") { val request = call.receive<MessageRequest>() val pingData = request.message.data val pingMessageAttributes = request.message.attributes val pingSenderId = pingMessageAttributes["source"] val pingRecipientId = pingMessageAttributes["subject"] val pongEvent = PubsubMessage.newBuilder() .setData(ByteString.copyFromUtf8(pingData)) .putAllAttributes(mapOf( "source" to pingRecipientId, "subject" to pingSenderId )) .build() val topicName = TopicName.of(projectName, outgoingMessagesTopic) val publisher = Publisher.newBuilder(topicName).build() publisher.publish(pongEvent).get() publisher.shutdown() call.respond("Message processed") } } }.start(wait = true) } - Create the file
aie-gcp/app/Dockerfilewith the following content:FROM gradle:7.3.1-jdk16 AS build WORKDIR /home/gradle/src COPY --chown=gradle:gradle . . RUN gradle shadowJar --no-daemon FROM openjdk:16-jre-slim EXPOSE 3000 WORKDIR /app COPY --from=build /home/gradle/src/build/libs/*.jar ./app.jar CMD ["java", "-jar", "./app.jar"]
- Create
Finally, build the Docker image:
cd aie-gcp/app
docker build -t <YOUR-DOCKER-HUB-USERNAME>/awala-codelab .
cd -
6. Deploy your app
First, you need to get your image on Docker Hub:
- Create the repository
awala-codelabon Docker Hub. - Push your image to Docker Hub:
docker push <YOUR-DOCKER-HUB-USERNAME>/awala-codelab
You can now deploy your app to Cloud Run:
- Create
aie-gcp/infrastructure/pong.tfwith the following content in order to deploy your Docker image to Cloud Run, and make sure to replace<YOUR-DOCKER-HUB-USERNAME>:resource "google_service_account" "pong" { project = var.google_project_id account_id = "awala-pong" display_name = "Awala Pong" } resource "google_cloud_run_v2_service" "pong" { project = var.google_project_id location = var.google_region name = "awala-pong" ingress = "INGRESS_TRAFFIC_INTERNAL_ONLY" template { timeout = "300s" service_account = google_service_account.pong.email execution_environment = "EXECUTION_ENVIRONMENT_GEN2" max_instance_request_concurrency = 100 containers { name = "pong" image = "<YOUR-DOCKER-HUB-USERNAME>/awala-codelab" env { name = "OUTGOING_MESSAGES_TOPIC" value = module.awala-endpoint.pubsub_topics.outgoing_messages } resources { startup_cpu_boost = true cpu_idle = false limits = { cpu = 1 memory = "512Mi" } } startup_probe { initial_delay_seconds = 3 failure_threshold = 3 period_seconds = 10 timeout_seconds = 3 http_get { path = "/" port = 8080 } } liveness_probe { initial_delay_seconds = 0 failure_threshold = 3 period_seconds = 20 timeout_seconds = 3 http_get { path = "/" port = 8080 } } } scaling { min_instance_count = 1 max_instance_count = 3 } } } - Now create
aie-gcp/infrastructure/messages_incoming.tfwith the following content to configure Google PubSub to send messages to your app:resource "google_service_account" "pong_invoker" { project = var.google_project_id account_id = "awala-pong-pubsub" display_name = "Awala Pong, Cloud Run service invoker" } resource "google_cloud_run_service_iam_binding" "pong_invoker" { project = var.google_project_id location = google_cloud_run_v2_service.pong.location service = google_cloud_run_v2_service.pong.name role = "roles/run.invoker" members = ["serviceAccount:${google_service_account.pong_invoker.email}"] } resource "google_pubsub_subscription" "incoming_messages" { project = var.google_project_id name = "pong.incoming-pings" topic = module.awala-endpoint.pubsub_topics.incoming_messages ack_deadline_seconds = 10 message_retention_duration = "259200s" # 3 days retain_acked_messages = false expiration_policy { ttl = "" # Never expire } push_config { push_endpoint = google_cloud_run_v2_service.pong.uri oidc_token { service_account_email = google_service_account.pong_invoker.email } attributes = { x-goog-version = "v1" } } retry_policy { minimum_backoff = "5s" } } - Finally, create
aie-gcp/infrastructure/messages_outgoing.tfwith the following content to allow your app to send messages to Google PubSub:resource "google_pubsub_topic_iam_binding" "outgoing_messages_publisher" { project = var.google_project_id topic = module.awala-endpoint.pubsub_topics.outgoing_messages role = "roles/pubsub.publisher" members = ["serviceAccount:${google_service_account.pong.email}", ] }
Finally, apply your changes with Terraform:
terraform apply
7. Test your app
- Install Awala Ping for Android.
- On your Android device, download the Connection Parameters file from your instance of the AIE by going to the
/connection-params.derpath. For example:https://awala.your-company.com/connection-params.der - Go to Awala Ping and import the connection parameters file you just downloaded.
- Send a ping message to your Awala Internet address.
After a few seconds, you should receive a pong message back. 🎉
If not, go to the Logging or Error reporting consoles, and check if something has gone wrong.
Clean up
Run terraform destroy to destroy all the billable resources you created. For good measure, you should also:
- Go to the GCP Resource Manager and delete the GCP project you created.
- Delete the MongoDB Atlas project you created.
- Delete the GCP credentials file from your disk.
Finally, delete the directory aie-gcp and the DNS SRV record you created.